

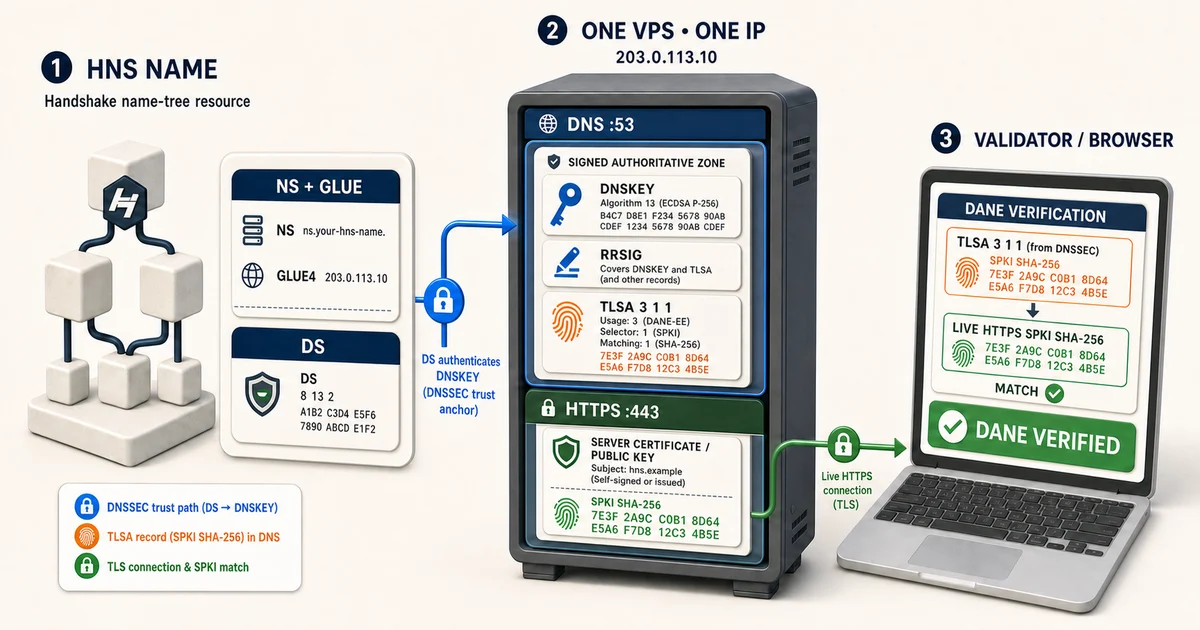
Handshake gives website owners a decentralized root of trust for names. To carry that trust to an HTTPS server, an HNS name can delegate to a DNSSEC-signed authoritative zone containing a TLSA record for the website’s TLS key.
The free, open-source HNS DANE Bootstrap Generator helps create the records and verification commands for that setup. Its source code is available on GitHub under the MIT License.
If you are new to the trust model, read Teaching DANE: How Handshake Names Carry Their Own Cryptographic Trust first.
The one-server model
A small HNS website does not need three servers or three public IP addresses. One VPS with one stable public IP can run both the authoritative DNS service and the website:
One VPS / one public IP
├── authoritative DNS: UDP and TCP port 53
└── website: TCP ports 80 and 443
DNS and web traffic can share an IP because they use different ports. The HNS name can delegate to an in-name host such as ns.your-hns-name. using GLUE4 or GLUE6, while the same machine serves the website.
This is the lowest-cost practical deployment and is the primary model in this guide. It does create a single point of failure. Additional authoritative nameservers are optional high-availability infrastructure that can be added later when a site’s availability requirements justify the cost.
What the generator does
The generator accepts the domain, nameserver, server address, DNSKEY, and website certificate or public key, then produces:
- HNS parent-side records such as NS, GLUE, SYNTH, and DS when appropriate;
- starter records or configuration for the authoritative DNS server;
- A, AAAA, SVCB, and TLSA records;
diganddelvverification commands; and- optional machine-readable JSON for integrations.
For TLSA, the default output is a DANE-EE public-key association:
_443._tcp.your-hns-name. IN TLSA 3 1 1 <SHA-256-SPKI-DIGEST>The generator accepts a PEM certificate or PEM public key and calculates the SubjectPublicKeyInfo digest locally in the browser. It does not need, and should never receive, the website’s private key.
What the generator does not do
The generator creates bootstrap records; it does not:
- submit an HNS wallet transaction;
- host authoritative DNS;
- sign a DNS zone;
- change a registrar or hosted-DNS account;
- install a certificate on the web server; or
- store or request wallet seeds, DNSSEC private keys, or TLS private keys.
The operator remains responsible for running the authoritative service, signing the zone, publishing the parent-side HNS records, and verifying the finished chain.
Before you begin
Prepare:
- An HNS name you control. You must be able to submit an HNS
UPDATE. - One VPS with a stable public IP. It can host both DNS and the website.
- Firewall access. Authoritative DNS needs public UDP and TCP port 53. The website normally needs TCP ports 80 and 443.
- An authoritative DNS server with DNSSEC signing. The public project includes presets for generic zone files, BIND, Windows Server DNS, PowerDNS, Knot, and NSD.
- The website’s PEM certificate or public key. Do not use the private key.
- An HNS-aware validating resolver for final testing.
The public repository also includes an early production-MVP Linode appliance path using Knot DNS, dnsdist, and nginx for operators who want a self-hosted one-server starting point.
Step 1: Open the generator
Open:
Launch the HNS DANE Bootstrap Generator
Choose:
- Domain type: HNS
- Setup mode: Delegated authoritative DNS
- DNS server preset: the server you actually operate, or Generic zone file
HNS SYNTH mode is also supported, but delegated mode with an in-name nameserver is easier to understand and audit for the one-server example.
Step 2: Enter the HNS name and server details
For a name such as your-hns-name/, a one-server configuration can use:
Domain: your-hns-name/
Nameserver hostname: ns.your-hns-name.
Nameserver IPv4: 203.0.113.10
Website IPv4: 203.0.113.10
TLS port: 443
Protocol: TCP
Replace the example address with the VPS’s real public address. The nameserver and website IP fields may contain the same address.
An in-name nameserver creates a circular lookup unless its address is supplied by the parent. For HNS, the generated GLUE4 or GLUE6 record provides that address while also establishing the nameserver delegation.
Step 3: Create and sign the authoritative zone
Copy the generated authoritative-server output into the selected DNS service and adapt its paths, ownership, and service configuration to the actual server.
At minimum, the signed zone needs:
- SOA and NS records;
- DNSKEY records;
- A and/or AAAA records for the website;
- a TLSA record for each protected service; and
- valid RRSIG records, including authenticated denial of non-existent records.
The authoritative service must:
- listen publicly on UDP and TCP port 53;
- have recursion disabled;
- increment the SOA serial after zone changes;
- keep DNSSEC signatures fresh; and
- protect DNSSEC private keys outside the public web root.
Step 4: Generate the parent DS record
After the authoritative zone is signed, copy its public DNSKEY into the generator. The generator calculates the DS record for the HNS parent resource.
Confirm that the DNSKEY comes from the exact active zone. Publishing a DS that does not match the child DNSKEY makes validating resolvers treat the zone as bogus.
Step 5: Update the HNS name
Copy only the generated parent-side material into the HNS wallet or name-management tool:
- the NS/GLUE delegation, or SYNTH resource when deliberately using SYNTH mode; and
- the DS record derived from the signed authoritative zone.
The website A/AAAA and TLSA records belong on the authoritative DNS server—not directly in the HNS wallet.
Review the update carefully before signing and wait for it to become active in the Handshake name tree.
Step 6: Verify DNSSEC and TLSA
First query the authoritative server directly:
dig +dnssec @203.0.113.10 your-hns-name. DNSKEY
dig +dnssec @203.0.113.10 _443._tcp.your-hns-name. TLSA
Then use the verification commands generated by the tool through an HNS-aware validating resolver:
dig @<HNS_VALIDATING_RESOLVER> your-hns-name. A +dnssec
dig @<HNS_VALIDATING_RESOLVER> _443._tcp.your-hns-name. TLSA +dnssec
Confirm:
- the HNS name reaches the intended nameserver;
- the parent DS matches the child DNSKEY;
- validation is secure rather than insecure or bogus;
- the TLSA record appears at the correct service owner name;
- the live website serves the key represented by TLSA; and
- the client used for testing actually implements DNSSEC validation and DANE.
dig +dnssec requests DNSSEC records but does not by itself prove validation. When querying a validating resolver, check for status: NOERROR and the authenticated-data (ad) flag.
Safe TLS key rotation
The default TLSA 3 1 1 output pins the service public key. If that key changes before caches receive the new TLSA record, DANE-aware clients can reject the connection.
Use a TTL-safe rollover:
- publish TLSA records for both the current and next public keys;
- wait at least the applicable DNS TTL and cache window;
- switch the web server to the new key and certificate;
- verify the new association through a validating resolver; and
- remove the old TLSA association after another safe TTL window.
Production checklist
- ☐ HNS name and wallet update authority confirmed
- ☐ One stable public server prepared
- ☐ UDP and TCP port 53 reachable
- ☐ DNS recursion disabled
- ☐ Website reachable on ports 80/443
- ☐ In-name nameserver and GLUE4/GLUE6 generated
- ☐ Authoritative zone signed with DNSSEC
- ☐ DS generated from the active DNSKEY
- ☐ HNS delegation and DS published
- ☐ TLSA generated from the exact public key served by the website
- ☐ DNSSEC validation confirmed through an HNS-aware resolver
- ☐ DANE-aware client behavior tested
- ☐ DNSSEC and TLSA rollover procedure documented
- ☐ Optional secondary nameserver considered according to actual availability needs